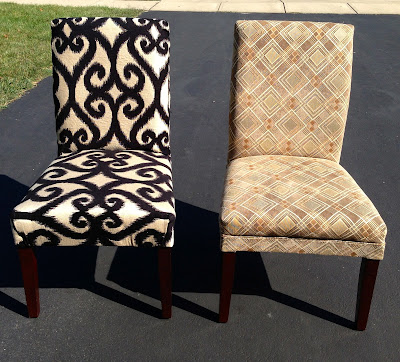
Materials needed for this project are scissors, material(you will need to figure amount), staple gun, staples, nail head studs, hammer, tape measure, screwdriver, patience, and time.
First measure your chair seat and back to figure out yardage. I needed 5 yards. Lay material flat and cut pieces for seat and back of chair.
Second, cover the material over the seat. Make sure the material is tight and lined up with your pattern. First, staple the sides and trim as needed. I did not take off original material. I think that is getting way to crazy for a beginner.
Third, for the front of the chair I pulled the fabric over and stapled. For the chairs legs, I used a screwdriver to push the material up evenly.
Fourth, pull the material down tightly to cover the staple. Staple the material on the bottom.
Fifth, starting the back of the chair. Staple the material to the bottom of the back. Then, staple the material as seen in the photo. You want to make sure that you leave the longest piece of material to fold over.
Sixth, the sides were the part of the project that took the longest. You will need to fold over material and hammer in the nail heads. I made sure these went through the wood, so they were secure enough to hold the material. I used 12 nail heads on each side. Also, cut over the excess material, so to get rid of the bulkiness.
I also added two nail heads to the front of the chair.
Lastly, I reapplied the black material that came with the original chair. It gives it a finished look and hides at the staples and material.
The first chair took the longest, but after I figured out the steps, each chair took a half an hour. These chairs are my favorite new edition to our house. My kids enjoyed doing their homework here this week. Well, as much as kids love homework.
Have you ever tried to reupholster? Have a great weekend.


Your chairs look amazing!! Have a fab weekend:)
ReplyDelete~Anne
Thanks Anne, I hope you have a great week.
DeleteXoxo,
Carrie
Oh Carrie-just when I thought I couldn't love you any more! I have been wanting to try to reupholster and these are SO FABULOUS!! I love!! I'm curious where you bought your fabric 'cause 5 yds can be spendy. They look so amazing! You should be seriously proud of yourself- Awesome job!!
ReplyDelete~Karen
Thanks so much Karen. To answer our question I purchased my material at Hobby Lobby on sale for 10 a yard. So, for my project it was a little over 100, which I figure I would pay over that for one chair. Have a great week.
DeleteXoxo,
Carrie
Oh my gosh. What a great job you did!
ReplyDeleteWell done, Carrie.
Thanks so much Adrienne.
DeleteXoxo,
Carrie
This comment has been removed by the author.
ReplyDeleteThese are great! What savvy vision you had for these chairs.
ReplyDelete