 |
| I absolutely loved this bow, worn by Kirsten Dunst, on the cover of Lucky magazine. |
 |
| Cut lace into a 11 inch by 10 inch rectangle. |
 |
| You will need to cut the silk fabric the same width as the lace, but the length should be 5 inches long. |
 |
| Fold the lace over the silk material and spray together with the Elmer's spray glue on newspaper. Let dry for 30 minutes. |
 |
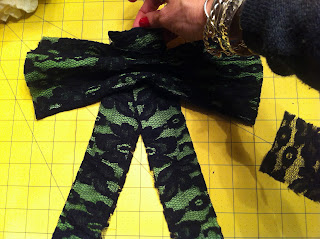
| To assemble the bow, first pinch at the middle of the rectangle. It will be stiff from the glue, so you can mold it however you want. |
 |
| Next, fold the two strips over the pinched area. Then tie the single piece of lace in the middle. Make sure to make a knot in the back. |
 |
| Next, trim the bow. I trimmed all four edges. |
 |
| You will need to hand sew the openings to give it that finished look. |
 |
| Last, glue jewelry pin to the bow with craft glue 600. After, lay a telephone book over and let it dry over night. |
. |


this is so cute! i love how you did the lace overlay. perfect for holiday parties!
ReplyDeleteOh - Fancy That.
so awesome! what a great tutorial - i wouldn't have even thought to try to make it! thanks for stopping by my blog. yours is great and now following :)
ReplyDeletexo
Fantastic DIY idea :) Great choice of color too.
ReplyDeleteOooo what a great DIY, I really like that its not permanent so you can switch it onto different shirts :) Great idea with the pinning. Thanks for sharing!
ReplyDeleteThank you for visiting my blog <3
Tasia
http://rufflesandsequins.blogspot.com
DEFINITELY trying this out!! Thanks for sharing!! I just stumbled upon your blog and L-O-V-I-N-G it!!
ReplyDeletexo
http://shanelesheek.blogspot.com/
Cool idea, think I will try this... thanks! :-)
ReplyDeleteHugs from NYC!
TravelDesignery.com
.
Such a great DIY, Carrie! You did an awesome job! I may need to try this too! xo
ReplyDeletecute! Nice work.
ReplyDeleteThanks everybody for your lovely comments.
ReplyDelete