Saturday, December 31, 2011

Getting Ready for 2012


I wish everyone a Happy New Year. I have had the best time writing my blog and can't wait to see what 2012 has in store. One project that I have been working on over the holidays is creating a space for all my projects. My mother  and brother Kevin came over 2 weekends ago and helped me organize an area in the basement for my studio. Well, after a week I have added a little color and feel inspired to create. I wanted to share my photos of my creative space and show that you can make a space with items you already own. See you in 2012.


The material used on my table were from a duvet I owned. I used a staple gun to secure it to the edge of the table. The frames  and the lime green paint were from my basement. I used some vintage necklaces  in the large frame. The curtain over the window is made from two pillow shams. 


This screen divider helps separate  my studio space from the rest of the basement. This screen my mom gave me and was a pale green. The pink and white material is from a curtain that I bought for $15.00. I was able to use this material in a variety of places. I also used chalkboard paint on this screen. The trunk I already owned and is great  for storage.

Love the chalkboard paint.

For storage I used those glass vases that take up cabinet space. I used them for my thread and zippers.  I already owned the paper flowers and vase.

This fabulous zebra chair is from the thrift store for $7.99. (Wow!) The shag pink rug is from  Walmart for $20.00. I spend a total of $42.00 on my space. This space is priceless  because it is mine to be creative and not have to worry about picking up a mess ever time I start a new project.

Tuesday, December 27, 2011

DIY- Making a Wine Glass Hostess Gift

A New Year's Eve gathering may be in your holiday season future. Often people bring a bottle of wine as a hostess gift. An easy gift is bringing some chalkboard painted wine glasses, for those bottles of wine. This project is easy and personal. I have taken these glasses to the holiday gatherings  I attended. I have given each hostess a set of 4 glasses. I loved them so much that I made myself a set.

Items need for the project are wine glasses(I got mine for a $1.00 each at the dollar store), painters or masking tape, newspaper, chalkboard paint, foam brush, chalk, and ribbon. I have a quart of chalkboard paint that has been lasting forever, but you can also buy chalkboard spray paint which is less expensive.
First, wrap painters tape around the stem of the wine glass and set them on newspaper.
Second, paint a coat of chalkboard paint and let it dry for about 30 minutes before applying another coat. You will need to put around five coats before removing the tape. When removing the tape, go slow and you may need to touch up around the the tape area.

Make sure to rub chalk  all over the chalkboard surface. This allows the chalkboard paint to cure to the wine glass surface. Finally , wipe the chalkboard surface off with a damp cloth and you can add a ribbon or charm to accessorize your glass.  Make sure on the gift card to the hostess give instructions to hand wash. This is a fabulous, inexpensive and personal hostess gift.


Monday, December 26, 2011

Final Holiday Dress


I hope everyone had a great Christmas. My family and I have had a wonderful holiday season. It will continue with more relatives coming to visit. My last holiday outfit was acquired from the thrift store. I absolutely love this dress. Its design is so simple and elegant. I love thrift stores because you never know what kind of treasures you might discover.  Lately, I have been going to thrift stores for things like buttons, material, sequins, or anything that can be used for my projects. Every now and then I will discover a great item like this dress. What have you thrifted lately?


Thrifted dress made by BCBG. It was $14.95. I got it for 75%  off that. So, the final price was  $4.00!

Thursday, December 22, 2011

A Look for Less - Costume National

This Short Dress, by Costume National, is from their Fall/ Winter 2011 RTW Collection. It retails for $1,103.00.


This Pearl Color Block Dress from ASOS is $54.54.


This Colour Block T-shirt Dress from ASOS is $72.72. Wow!

I have been enamored by the Costume National 2011 Fall RTW Collection. I  love their dress with its color blocking pattern and found two dresses from ASOS with the same fabulous pattern, for a lot less.  Both of these dresses are extraordinary, but I think the Colour Block T-Shirt Dress is a great dress for many body types and could easily be paired with a sweater for winter. I would love to hear what you think.

Tuesday, December 20, 2011

DIY- Eyeglass case cheetah clutch- Inspiration Rebecca Minkoff

I was reading my November 2011edition of InStyle Magazine and came across this Rebecca Minkoff ' s oversize cheetah hair calf clutch. I kept this  for a future DIY. When my mother came over this weekend with this fabulous cheetah coat she had bought from the thrift store, I knew I had the perfect material for this clutch.

Things you will need to complete this project are: cheetah fabric(can be found at a craft store), and large eyeglass case.  Eyeglass cases can be found by the masses at thrift stores. Mine is 7 inches by 3 inches. You will also need fabric glue, Amazing GOOP adhesive, paintbrush, scissors, black ribbon, clips, and a heavy object.

First, you will separate the inside from the outside of the eyeglass case. Only lift the edges,  not the whole interior.

Second, then use the brush to paint fabric glue between the inside and the outside of the eyeglass case.

Third, push the fabric in between the interior and the exterior of the eyeglass case.

Fourth, paint the fabric glue on the back of the case.

Fifth, cut the excess fabric before following step three for the other side of the eye glass case.

Sixth, use the Goop adhesive between the interior and the exterior of the eye glass case. Just pull the two parts apart, because  fabric glue wil lnot fully dried. This allowed me to put two pieces of ribbon on each side in the middle of the case. I cut ribbon pieces to 10 inches. You can trim these later. You will then need to clip the sides for the adhesive to adhere. Let it dry overnight. After removing the clips, you will need to close the case and place something heavy on top of it. I actually put mine under a piece o f furniture. This helps make sure there is no gap when the case is closed.

I couldn't be more pleased with the finished product. I can't wait to use my cheetah clutch. I would love to hear what you think.

Sunday, December 18, 2011

More Sequins...

There is no doubt that sequins are a huge trend this holiday season. An alternate to that sequin skirt or dress is jeggings.The sequin leggings are from Express (a fabulous Christmas present from one of my dearest friends), shirt from Gap, shoes are Mossimo Viviana Platform pump from Target, sunglasses and scarf- Forever 21. The purse and the black bracelet are from a thrift store.


Friday, December 16, 2011

Look For Less- Enameled bangle

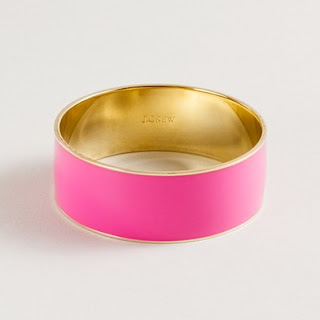
J.Crew's Wide hand-enameled bangle -$35.00

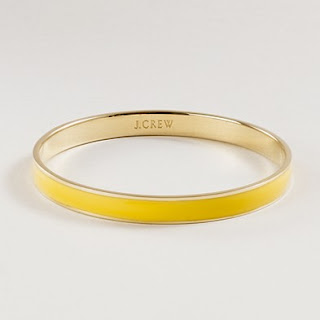
J.Crew's Thin hand-enameled bangle -$20.00


This set is an enameled bangle set for $10.80 from Forever 21, currently only in stores.

Thin enameled bangle - Forever 21 $2.80

Enameled Bangle Set -Forever 21- $6.80


 I adore these enamel bracelets. While the J.Crew bracelets are fabulous, your budget may only allow for one or two colors.  I suggest trying the selections offered at Forever 21.  These would make great Christmas gifts.  Bright colors are going to be a trend we will see this spring. I also think adding bright colors on your wrist this winter will brighten those gloomy days.  I purchased the $10.80 enameled set from Forever 21 and can't wait to wear them. Would love to hear what you think of these bracelets.

Wednesday, December 14, 2011

DIY- Lace Bow As Seen in Lucky Magazine

I absolutely loved this bow, worn by Kirsten Dunst, on the cover of Lucky magazine.

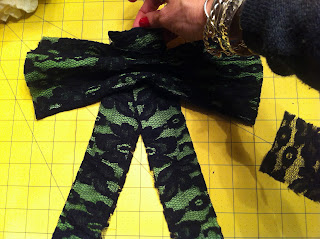
Things you will need to complete this project are craft Glue 600, Elmers's Spray Adhesive, jewelry pin back, black thread, needle, newspaper, scissors, and material. I purchased my material at the thrift store. They were scarves for a total $3.00. You can find black lace and any silk fabric color you choose at your local craft store. 

Cut lace into a 11 inch by 10 inch rectangle.

You will need to cut the silk fabric the same width as the lace, but  the length should be 5 inches long.

Fold the lace over the silk material and spray together with the Elmer's spray glue on newspaper. Let dry for 30 minutes.

Next, you will need to make the two pieces that hang down from the bow. The lace should be 11 inches long and 4 inches wide. The silk material should be 11 inches long and 2 inches wide. Follow same steps as large rectangle with glue. The last piece needed is a single piece of lace 11 inches by 2 inches. This is used for the middle of the bow, to tie all three pieces together.

To assemble the bow, first pinch at the middle of the rectangle. It will be stiff from the glue, so you can mold it however you want.

Next, fold the two strips over the pinched area. Then tie the single piece of lace in the middle. Make sure to make a knot in the back.

Next, trim the bow. I trimmed all four edges.

You will need to hand sew the openings to give it that finished look. 

Last, glue jewelry pin to the bow with craft glue 600. After, lay a telephone book over and let it dry over night.


.

I pinned the bow to my shirt under my sweater, so I didn't put holes in my sweater. I  loved how it turned out. I think it looks great with a long sleeve shirt for winter and short sleeve shirt for summer.  I would love to hear what you think.  Make sure to sign up for Bloglovin'  it helps you follow my blog and lets you know when its updated.

Monday, December 12, 2011

A Look for Less -Stella McCartney

Stella McCartney

Lucia stretch cotton-blend and tulle dress

retails for $2,155.


My look for less for the Stella McCartney dress above is this Dotted Mesh Black Dress. It is Laundry by Shelli Segal at Lord and Taylor for $195.00. (I did find it on sale at Nordstroms for $99.00, but only one size left.) I absolutely love Stella McCartney, but if you need an inexpensive substitute I think this will work for a variety of body types. It would be great for a night out or a party.  Would this be a dress you would wear?


Saturday, December 10, 2011

Ready for some holiday cheer....

Dress is As You Wish from Nordstrom , Shoes are Mossimo Viviana Platform Pump at Target.  Lipstick is Mac - Girl About Town

An option to the traditional cardigan is wearing a blazer . This one is Frenchi from  Nordstrom. Clutch and sunglasses are from Forever 21.

Thursday, December 8, 2011

Would you buy something just because it is on sale?


I am the first one to look for a bargain. I love finding deals at thrift stores, garage sales, and retail stores. As a consumer, when I buy something I want to get it for the best price. I find that friends of mine and myself included, when buying something just for the sake of being on sale that item may never be used or worn. I recently was shopping, and noticed a pair of jeans that were on sale. When I tried them on I really wasn’t sure if I liked them. I ask the sales associate what he thought and he said, “ I mean, buy it for the price”. That actually deterred me from buying the item, because I wanted an honest opinion not based on price. When I am buying an item on sale or not, I try not let the price persuade me.  I find that when I do, I really don’t use the item and I kind of feel like I settled, instead of getting what I really wanted.


Two tips when buying something on sale:
  1.   Make sure that if you buy something on sale, that it was something you would have bought regardless of the sale price.
  2.    Look around the store to see if there is anything else you are interested in. Maybe you will decide to put back any sale items and buy the item you are really interested in.

I would love to hear your thoughts on this topic. Look soon, for a new look for less!

Tuesday, December 6, 2011

DIY: Making a Fur Peter Pan Collar

It seems like everywhere I look this fall I see fur. I was recently looking on a couple of websites. I saw these Peter Pan fur collars ranging from $20-$35. Quickly, I said, "I can make that!" and off to the craft store I went. This was a pretty feasible project and I loved how it turned out.  To complete this project you will need: fur and backing material at least 12 inches by 12 inches, craft glue, No Fray adhesive,  stick pins, ribbon( whatever color you choose), paper for a pattern, pencil, scissors, and something heavy.

First, you will have to draw a pattern on paper. This will be used as your template. I tried it on my neck after I cut it out.

Second, as you see, I rounded my edges to make the collar have more of a Peter Pan look, and I also had to fold the back to fit my neck size.

Third, you will need to place the pattern on the fur material. You will need to fasten the material to the pattern so it will not slip as you are cutting.


Fourth, once you have cut out the fur, make sure to try it on your neck before going any further on these directions. If it fits well, then take the material that you chose for the backing and pin it to the pattern. You will use the pattern to cut, instead of pinning it to the fur, so that you can cut as close to make equal sizes of the fur and the backing.

Fifth, you will need to make sure the backing material  fits evenly on the back of the fur. If not you can cut accordingly. Then cut the ribbon into two 17 inch pieces.

Sixth, you will glue the backing material to the fur with fabric glue on both insides facing to each backing.  You will need to lift the sides up off the backing material and glue 2 1/2 inches of the ribbon between the two fabrics. Then, use the No Fray adhesive on the edges and lay something heavy, like a telephone book, to help the glue adhere to the two fabrics.

This project only took about 30 minutes and the  finished product is fabulous. Let me know if you tried the project or just what you think !